Chimney Flashing and Fall Maintenance: The Leak Source Homeowners Miss
Every fall we get calls from homeowners who are certain their shingles are failing because they've got a stain spreading across the ceiling near the fireplace. Nine times out of ten, the shingles are fine. The problem is a few feet away, where the chimney punches through the roof deck — a spot most people never think to look at until water is already coming through the drywall.
Chimney flashing is one of the least glamorous parts of a roof and one of the most failure-prone. It's also the piece of the roof most likely to get overlooked during a casual once-over, because from the ground it looks fine. You have to get up close, or at least know what you're looking for through binoculars, to catch the early signs.
Why Chimneys Leak Before Anything Else Does
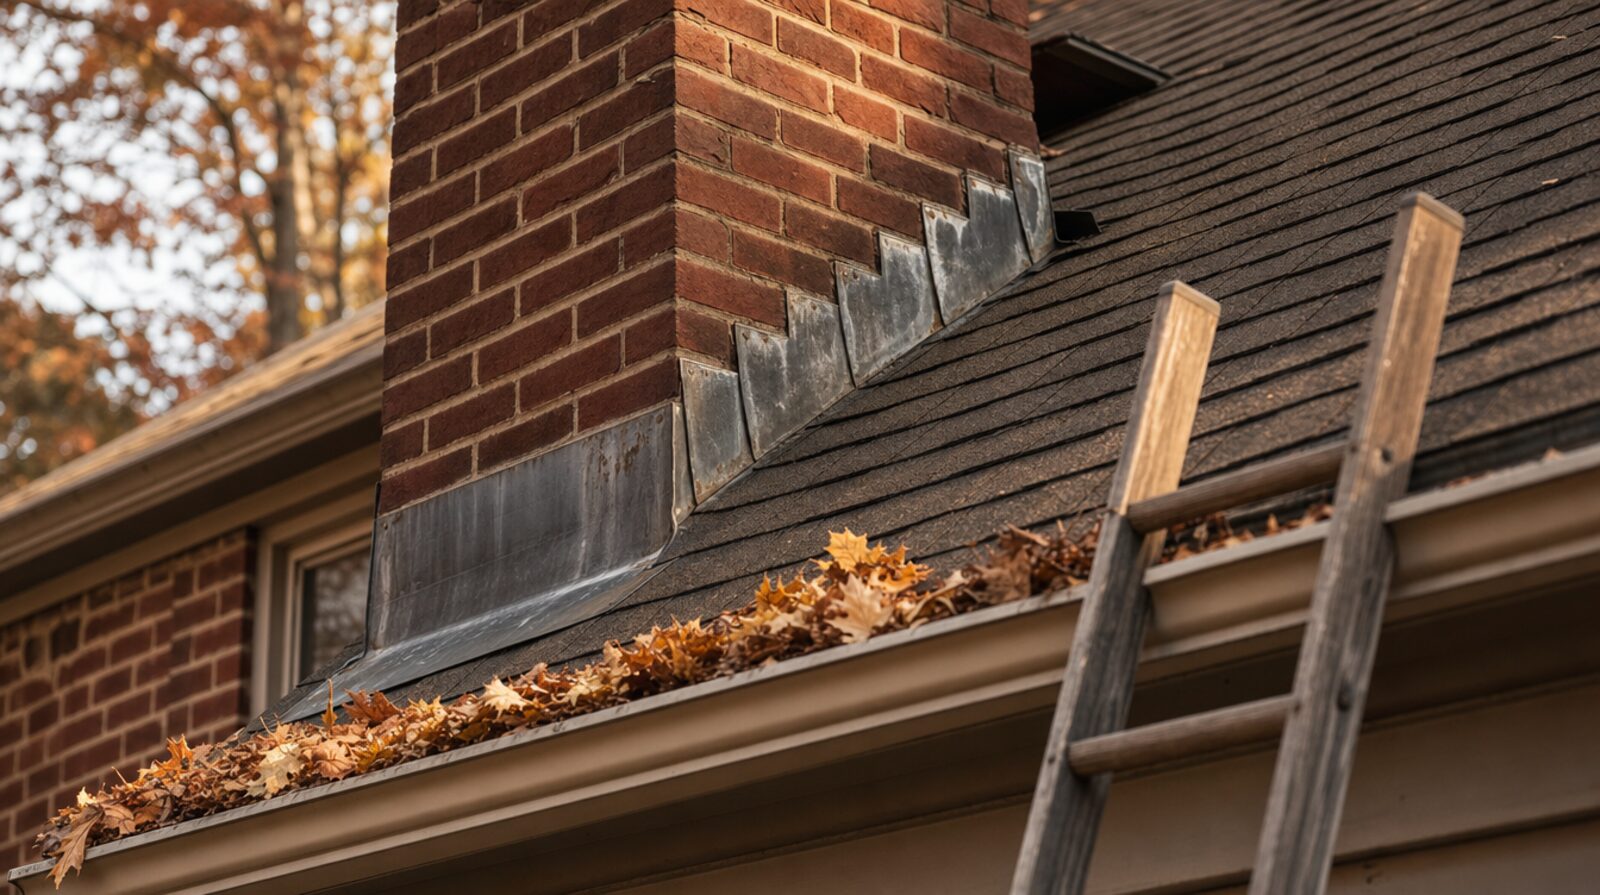
A chimney is a masonry or metal structure sitting in the middle of what should otherwise be a continuous water-shedding surface. Every place a roof plane is interrupted — chimneys, skylights, plumbing vents, dormers — is a place where the roofing material can't just overlap itself to shed water. That's what flashing is for: metal (usually aluminum, galvanized steel, or copper) that's woven into the roofing system to bridge the gap and route water around the obstruction instead of through it. A proper chimney flashing system has three parts working together:
- Base flashing (apron): a piece that runs up the front of the chimney and out onto the roof deck below it.
- Step flashing: individual L-shaped pieces woven in with each course of shingles up the sides of the chimney, so water is directed down and off at every layer rather than pooling.
- Counter-flashing (cap flashing): the top piece, set into a mortar joint or under a reglet cut in the brick, that overlaps the step flashing and keeps water from ever getting behind it in the first place.
When all three are installed and sealed correctly, water runs off the chimney and onto the roof like it's supposed to. When any one of them fails — and in our experience the counter-flashing and the mortar joint holding it are usually the first to go — water finds its way behind the flashing and into the framing, often with no visible sign on the roof surface at all. By the time you see a stain inside, the leak has usually been active for a while.
What Fall Does to Chimney Flashing
Flashing failures tend to show up in the fall for a straightforward reason: it's the transition season. Metal flashing and the mortar it's set into expand in summer heat and contract as temperatures drop, and that repeated movement over the years works sealant loose and can hairline-crack mortar joints. Add in a wet spring and summer's worth of thermal cycling on the Piedmont's clay soil and masonry, and by the time the first cold fall rains roll through the Triad, small gaps that were dry all summer suddenly aren't.
Falling leaves compound the problem. Leaves and debris pile up in the crotch where the chimney meets the roof — right where base flashing lives — and hold moisture against the metal and the shingles for days at a time instead of letting the area dry out between rains. That constant damp accelerates rust on steel flashing and helps sealant fail years before it should.
What to Check Before Winter
You don't need to get on the roof to catch most of this. A pair of binoculars from the yard and a walk through the attic with a flashlight will tell you most of what you need to know.
- From the ground: Look at the mortar line where the counter-flashing disappears into the brick. Gaps, crumbling mortar, or flashing that's pulled away and is visibly lifted off the brick are all red flags.
- At the base: Check for a buildup of leaves or granule wash sitting in the corner where the chimney meets the roof. Clear it out if you can safely reach it — trapped debris there is doing slow damage even when it isn't causing an active leak yet.
- In the attic: On a dry day, look at the underside of the roof deck and the framing around the chimney chase for water staining, dark streaking, or soft/discolored wood. This is often the earliest and most reliable evidence of a flashing problem, well before it shows up on a ceiling below.
- After a hard rain: Check the attic again. Active drips or fresh damp spots right after a storm point you straight to the leak's timing, which helps narrow down whether it's flashing, a chimney cap, or something else entirely.
- Sealant condition: Any exposed caulk or roofing cement used around the flashing should still be flexible, not cracked or chalky. Old sealant that's dried out and separated from the metal or masonry is not doing its job anymore, even if it still looks intact from a distance.
Why This Isn't a DIY Caulk-Gun Fix
We understand the instinct to grab a tube of roofing sealant and call it handled. Sometimes that buys you a season. But sealant alone doesn't address step flashing that's rusted through, mortar joints that need to be reglet-cut and repointed, or base flashing that was undersized or installed incorrectly to begin with — which is more common than you'd think, especially on older Triad homes where a chimney has been repointed or capped over the years without anyone revisiting the flashing underneath.
Chimney flashing repair also means working at a roof penetration, on a steep plane, often several stories up — not a place to be learning as you go. If your fall walk-around turns up any of the warning signs above, it's worth having it looked at before winter weather turns a slow, hidden leak into a ceiling repair. Catching flashing problems in November is a lot less disruptive than finding them in January when the same leak has had two more months and a few freeze-thaw cycles to work on your roof deck.
Stop Guessing on Price
Get precise measurements and a detailed price range for your specific roof right now using our AI technology. No home visit required.
Get my price